|
|
|
|
|
|
The <form> Element |
|
|
|
|
<form> |
The HTML <form> element defines a form that is used to collect user
input |
|
|
|
. |
|
|
|
|
form elements |
Form elements are different types of input elements, like text
fields, checkboxes, radio buttons, submit buttons, and more. |
|
|
|
. |
|
|
|
|
</form> |
|
|
|
|
|
|
The
<input> Element |
|
The <input> element is the most important form element. |
|
|
|
The <input> element can be displayed in several ways,
depending on the type attribute. |
|
|
|
|
|
|
Type |
Description |
|
|
|
<input
type="text"> |
Defines a one-line text input
field |
|
|
|
<input
type="radio"> |
Defines a radio button (for
selecting one of many choices) |
|
|
|
<input
type="submit"> |
Defines a submit button (for
submitting the form) |
|
|
|
|
|
Text Input |
<input
type="text"> |
defines a one-line input field for text
input |
|
|
|
<form> |
|
|
|
|
First name:<br> |
|
|
|
|
<input
type="text" name="firstname"> |
First name: |
|
|
|
<br> |

|
|
|
|
Last name:<br> |
Last name: |
|
|
|
<input
type="text" name="lastname"> |
|
|
|
|
</form> |
|
|
|
<p>Note that the form itself is not visible.</p> |
Note that the form itself is
not visible. |
|
|
|
<p>Also note that the default width of a text input
field is 20 characters.</p> |
Also note that the default
width of a text input field is 20 characters. |
|
|
|
|
|
Radio Button
Input |
<input type="radio"> |
defines a radio button |
|
|
|
<form> |
|
|
|
|
<input type="radio" name="gender" value="male" checked> Male<br> |

|
|
|
|
<input
type="radio" name="gender" value="female">
Female<br> |
Female |
|
|
|
<input
type="radio" name="gender" value="other">
Other |
Other |
|
|
|
</form> |
|
|
|
|
|
|
|
|
|
The Submit
Button |
|
defines a button for submitting the form data to a form-handler. |
|
|
|
<input type="submit"> |
The form-handler is typically a
server page with a script for processing input data. |
|
|
|
<form action="action_page.php"> |
The form-handler is specified
in the form's action attribute: |
|
|
|
First name:<br> |
|
|
|
|
<input type="text"
name="firstname" value="Mickey"> |

|
|
|
|
<br> |
|
|
|
|
Last name:<br> |
|
|
|
|
<input type="text"
name="lastname" value="Mouse"> |
|
|
|
|
<br><br> |
|
|
|
|
<input type="submit"
value="Submit"> |
|
|
|
|
</form> |
|
|
|
|
<p>If you click the "Submit" button, the
form-data will be sent to a page called
"action_page.php".</p> |
|
|
|
|
|
|
|
|
|
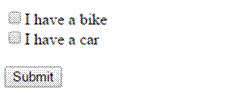
Input Type Checkbox |
|
|
|
|
<input type="checkbox"> |
defines a checkbox |
|
|
|
<form action="action_page.php"> |
|
|
|
|
| <input type="checkbox" name="vehicle1" value="Bike"> I have a bike<br> |
|
|
|
|
|
<br> |
|
|
|
|
<input type="checkbox" name="vehicle2" value="Car"> I have a
car |
|
|
|
|
<br><br> |
|
|
|
|
<input
type="submit"> |
|
|
|
|
</form> |
|
|
|
|
|
|
|
|
|
|
|
|
|
|
The Action
Attribute |
|
The action attribute
defines the action to be performed when the form is submitted. |
|
|
|
<form action="action_page.php"> |
Normally, the form data is sent to a web page on the server
when the user clicks on the submit button. |
|
|
|
In the example above, the
form data is sent to a page on the server called "action_page.php".
This page contains a server-side script that handles the form data |
|
|
If the action attribute is
omitted, the action is set to the current page. |
|
|
|
|
|
The Method Attribute |
|
The default method when submitting form data is GET. |
|
|
|
However, when GET is used, the submitted form data will
be visible in the page address field |
|
|
|
Note: GET must NOT be used when
sending sensitive information! GET is best suited for short, non-sensitive,
amounts of data, because it has size limitations too. |
|
|
|
<form action="action_page.php" method="get"> |
Always use POST if the
form data contains sensitive or personal information. The POST method does
not display the submitted form data in the page address field. |
|
|
or |
POST has no size limitations,
and can be used to send large amounts of data. |
|
|
|
<form action="action_page.php" method="post"> |
|
|
|
The Name Attribute |
|
Each input field must have a name attribute to be submitted. |
|
|
|
If the name attribute is omitted, the data of that input field
will not be sent at all. |
|
|
|
|
|
|
|
|
|
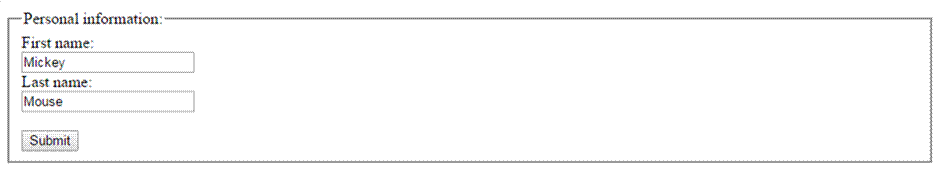
Grouping Form Data with <fieldset> |
|
The <fieldset> element is used to group related data in a form. |
|
|
|
The <legend> element defines a caption for the <fieldset>
element. |
|
|
|
|
|
|
|
<fieldset> |
|
|
|
<legend> |
|
|
|
<form action="action_page.php"> |
|
|
|
<fieldset> |
|
|
|
<legend>Personal information:</legend> |
|
|
|
First name:<br> |
|
|
|
<input type="text" name="firstname" value="Mickey"><br> |
|
|
|
Last name:<br> |
|
|
|
<input type="text" name="lastname" value="Mouse"><br><br> |
|
|
|
<input type="submit" value="Submit"> |
|
|
|
</fieldset> |
|
|
|
|
</form> |
|
|
|
|
|
|
The <select> Element |
|
The <select> element defines a drop-down
list |
|
|
|
<select> |
By default, the first item in
the drop-down list is selected. |
|
|
|
<p>You can preselect an option with the selected
attribute.</p> |
To define a pre-selected
option, add the selected attribute
to the option |
|
|
|
The <option> elements defines an option that can be selected. |
|
|
|
<form action="action_page.php"> |
By default, the first item in the drop-down list is selected. |
|
|
|
<select name="cars"> |
To define a pre-selected option, add the selected attribute to the
option |
|
|
|
<option
value="volvo">Volvo</option> |
|
|
|
|
<option
value="saab">Saab</option> |
You can preselect an option
with the selected attribute. |
|
|
|
<option value="fiat" selected>Fiat</option> |
|
|
|
|
<option
value="audi">Audi</option> |
|
|
|
|
</select> |
|
|
|
<br><br> |

|
|
|
|
<input type="submit"> |
|
|
|
|
</form> |
|
|
|
|
|
|
|
|
|
|
|
|
|
|
|
The <button> Element |
|
| The <button> element
defines a clickable button |
|
|
|
|
|
|
|
|
|
|
|
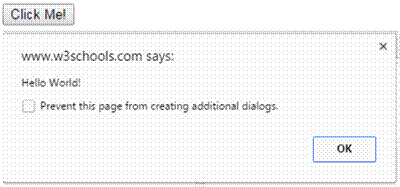
<button type="button" onclick="alert('Hello World!')">Click Me!</button> |
|
|
|
|
|
|
|
|
|
|
|
|
|
|
|
|
|
|
|
|
|
|
|
|
|
|
|
The <textarea> Element |
|
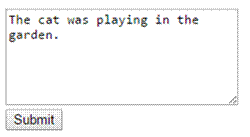
The <textarea> element defines a multi-line input field (a text area) |
|
|
|
|
|
|
|
The rows attribute
specifies the visible number of lines in a text area. |
|
|
|
<textarea> |
The cols attribute specifies the visible width of a text area. |
|
|
|
<form action="action_page.php"> |
|
|
|
|
<textarea name="message" rows="6" cols="30">The cat was playing in the garden.</textarea> |
|
|
|
|
<br> |
|
|
|
|
<input
type="submit"> |
|
|
|
|
</form> |
|
|
|
|
|
|
|
|
|
The <button> Element |
|
The <button> element defines a clickable button |
|
|
|
|
|
|
|
|
|
|
HTML5
<output> Element |
<button> |
The <output> element represents the result of a
calculation (like one performed by a script). |
|
|
|
<button type="button" onclick="alert('Hello World!')">Click Me!</button> |
|
|
|
|
|
|
|
<output> |
|
|
|
|
<form action="action_page.php" |
|
|
|
oninput="x.value=parseInt(a.value)+parseInt(b.value)"> |
|
|
|
0 |
|
|
|
<input type="range" id="a" name="a" value="50"> |
|
|
|
100 + |
|
|
|
|
<input type="number" id="b" name="b" value="50"> |
|
|
|
|
= |
|
|
|
|
<output name="x" for="a b"></output> |
|
|
|
|
<br><br> |
|
|
|
|
<input type="submit"> |
|
|
|
|
</form> |
|
|
|
|
|
|
|
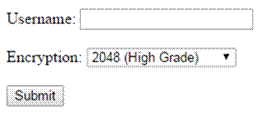
HTML5 <keygen> Element |
<keygen> |
The purpose of the <keygen> element is to
provide a secure way to authenticate users. |
|
|
|
The <keygen> element
specifies a key-pair generator field in a form. |
|
|
|
<form action="action_page.php"> |
When the form is submitted, two
keys are generated, one private and one public. |
|
|
|
Username: <input type="text" name="user"> |
The private key is stored
locally, and the public key is sent to the server. |
|
|
|
<br><br> |
The public key could be used to
generate a client certificate to authenticate the user in the future. |
|
|
|
Encryption: <keygen name="security"> |
|
|
|
|
<br><br> |
|
|
|
|
<input type="submit"> |
|
|
|
</form> |
|
|
|
|
|
|
|
|
|
|
|
|
|
|
|
|
|
|
|
|
|
|
Input Type
Password |
|
defines a password field |
|
|
|
|
|
|
User name: |
|
|
|
<input type="password"> |
|
|
|
|
User password: |
|
|
|
<form> |
|
|
|
|
User name:<br> |
|
|
|
<input type="text" name="username"><br> |
The characters in a password
field are masked (shown as asterisks or circles). |
|
|
|
<br> |
|
|
|
|
User password:<br> |
The characters in a password field are masked (shown as
asterisks or circles). |
|
|
|
<input type="password" name="psw"> |
|
|
|
|
</form> |
|
|
|
|
<p>The characters in a password field are masked (shown
as asterisks or circles).</p> |
|
|
|
|
|
|
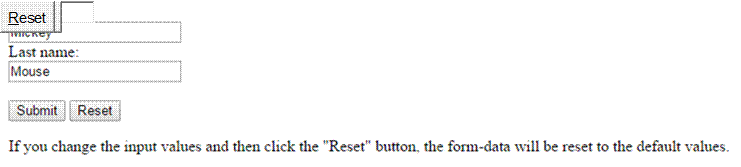
Input Type Reset |
|
defines a reset button that will reset all form values to their default values |
|
|
|
|
|
|
|
<input type="reset"> |
|
|
|
|
|
|
First name:<br> |
|
|
|
<input type="text" name="firstname" value="Mickey"><br> |
|
|
|
<br> |
|
|
|
Last name:<br> |
|
|
|
<input type="text" name="lastname" value="Mouse"><br><br> |
|
|
|
<br><br> |
|
|
|
<input type="submit" value="Submit"> |
|
|
|
<input type="reset"> |
|
|
|
|
</form> |
|
|
|
|
<p>If you change the input values and then click the
"Reset" button, the form-data will be reset |
|
|
|
|
to the default
values.</p> |
|
|
|
|
|
|
|
|
|
Input Type Number |
|
|
|
|
The <input
type="number"> |
defines a numeric input field. |
|
|
|
You can also set restrictions
on what numbers are accepted. |
|
|
|
<form> |
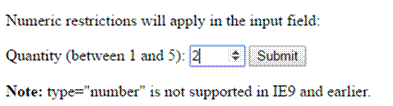
| The
example displays a numeric input field, where you can enter a value from 1
to 5 |
|
|
|
|
Quantity (between 1 and 5): |
|
|
|
|
<input type="number" name="quantity" min="1" max="5"> |
|
|
|
|
</form> |
|
|
|
|
<p><b>Note:</b> type="number" is
not supported in IE9 and earlier.</p> |
|
|
|
|
|
|
|
|
|
Input Type Date |
|
|
|
|
The <input
type="date"> |
is used for input fields that should contain a date. |
|
|
|
|
|
|